- Assignments
- Calendar
- Conversations
- Discussions
- Lessons
- Messages
- Profile
- Rubrics
- Tests and Quizzes
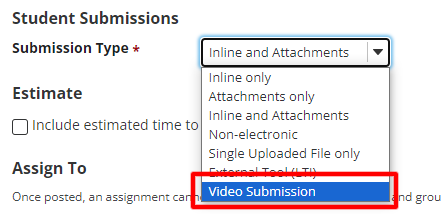
Video Submission
Now allows for assignments to accept video submissions.
To create a video submission assignment:
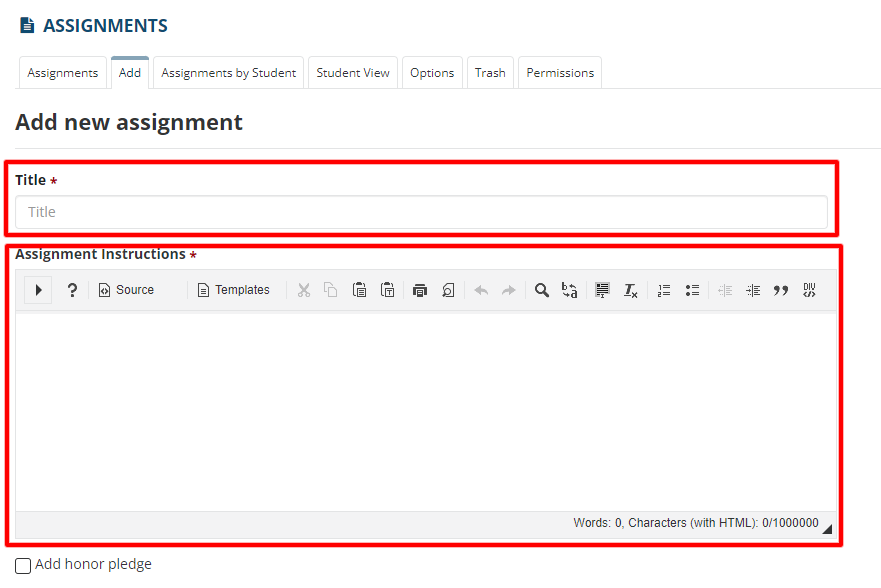
- Click Add in the Assignments tool.
- Fill in the required fields like assignment title, instructions, etc.
- Then click the dropdown menu next to Submission Type.
- Select Video Submission.
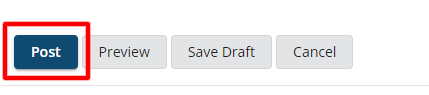
- Post the assignment.


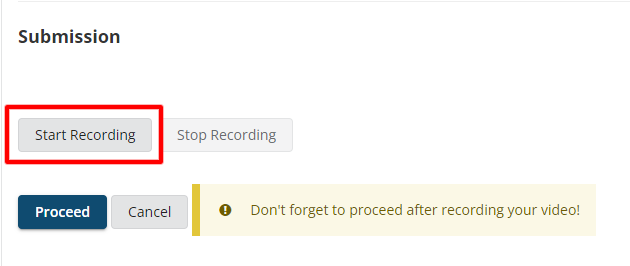
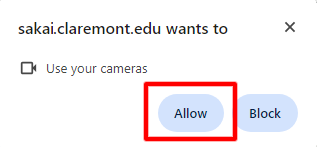
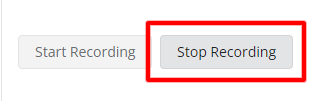
To submit a video submission as a student:
- Click on the assignment title in the Assignments tool.
- Click Start Recording.
- Allow your browser to access your camera and microphone if you haven't already.
- Click Stop Recording when you are done with the assignment.
- Click Proceed, then Submit.
Back to table of contents
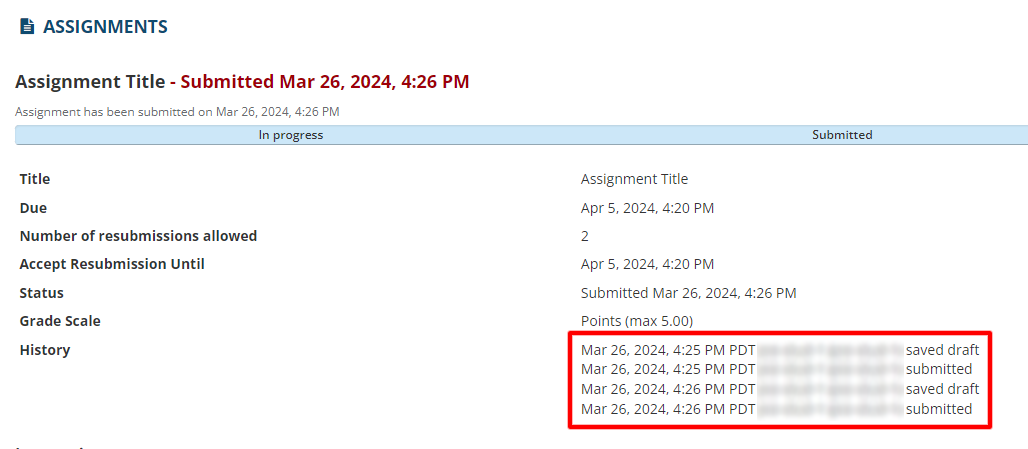
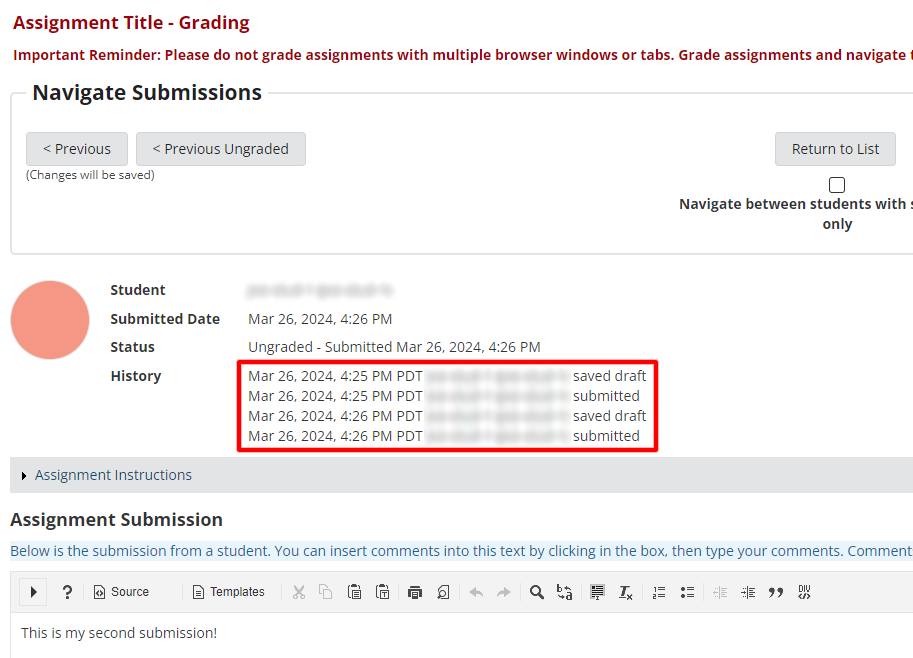
Submission History
When you allow resubmissions on an assignment, now it will display the submission history to both students and instructors.
To see this as a student, click on the assignment you want to view and it will display the submission history beside the new section titled History.
Similarly, to access this as an instructor, using the legacy grader (by unchecking Use Sakai Grader to grade submissions in the Grade page of the assignment) click on a student whose submissions history you would like to view. Then, the submission history will be dsplayed in the History section next to the student's profile picture
Back to table of contents
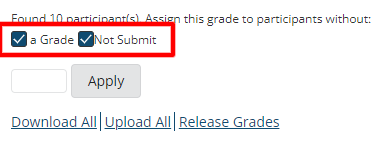
New Bulk Grading Functions
Now allows instructors to bulk grade submissions without a grade, submission, or both. Previously, bulk grading only applied to students without a grade.
Back to table of contents
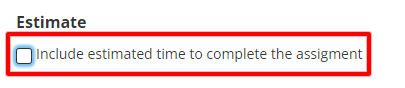
Worklog
Allows insturctors to add a new component to an assignment where students can log the time they spent working on the it in the format of XXh XXm
To turn on this feature for an assignment:
- Create an assignment or edit an existing assignment.
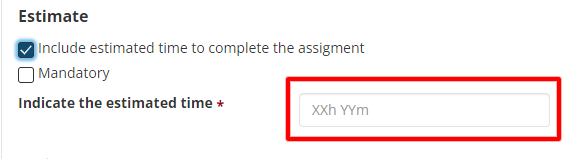
- In the assignment creation/edit page, click on Include estimated time to complete the assignment checkbox under Estimate.
- (Optional) Check Mandatory if you would like to make this function mandatory.
- Insert the estimated time a student should spend on the assignment (XXh XXm)
- Post the assignment.
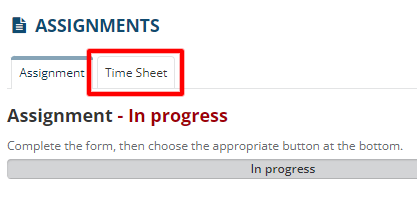
To access the worklog feature as a student:
- Start the assignment with the worklog feature in Assignments.
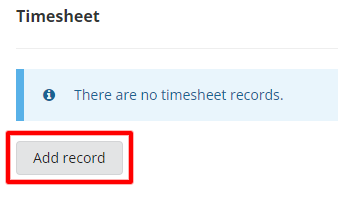
- Click on the Time Sheet tab on the top of the page
- Click Add Record
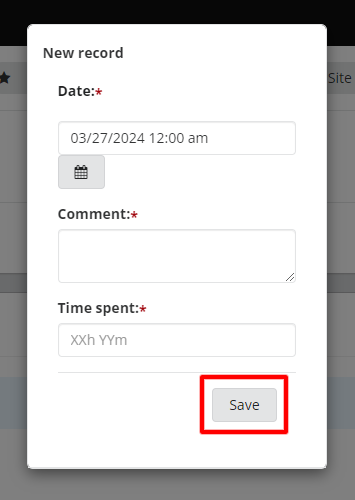
. - Insert the date, comments and time spent and click Save.
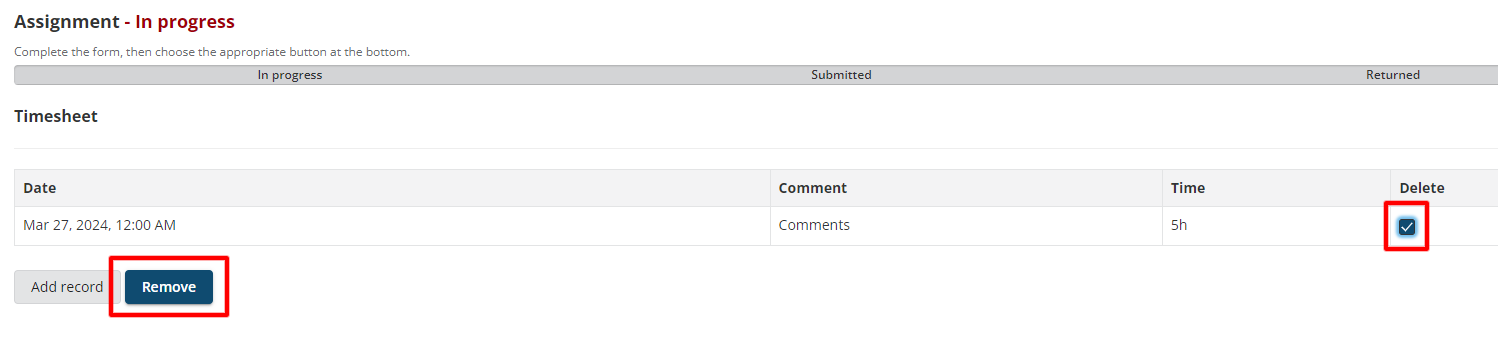
- To delete a record, check the checkbox under Delete and click Remove.
- To submit your time spent, navigate to the Time Spent section located under the Assignment Text.
- Then either manually input your time spent or use the total time tracked on the Time Sheet by checking the Use inputted time in the Time Sheet (XXh XXm) option.

Back to table of contents
Grade Autosave
While grading a student using the Sakai Grader, if you move to another page or use the left/right buttons to view another student, your grades will be automatically saved (but not released) before the page changes.
Back to table of contents
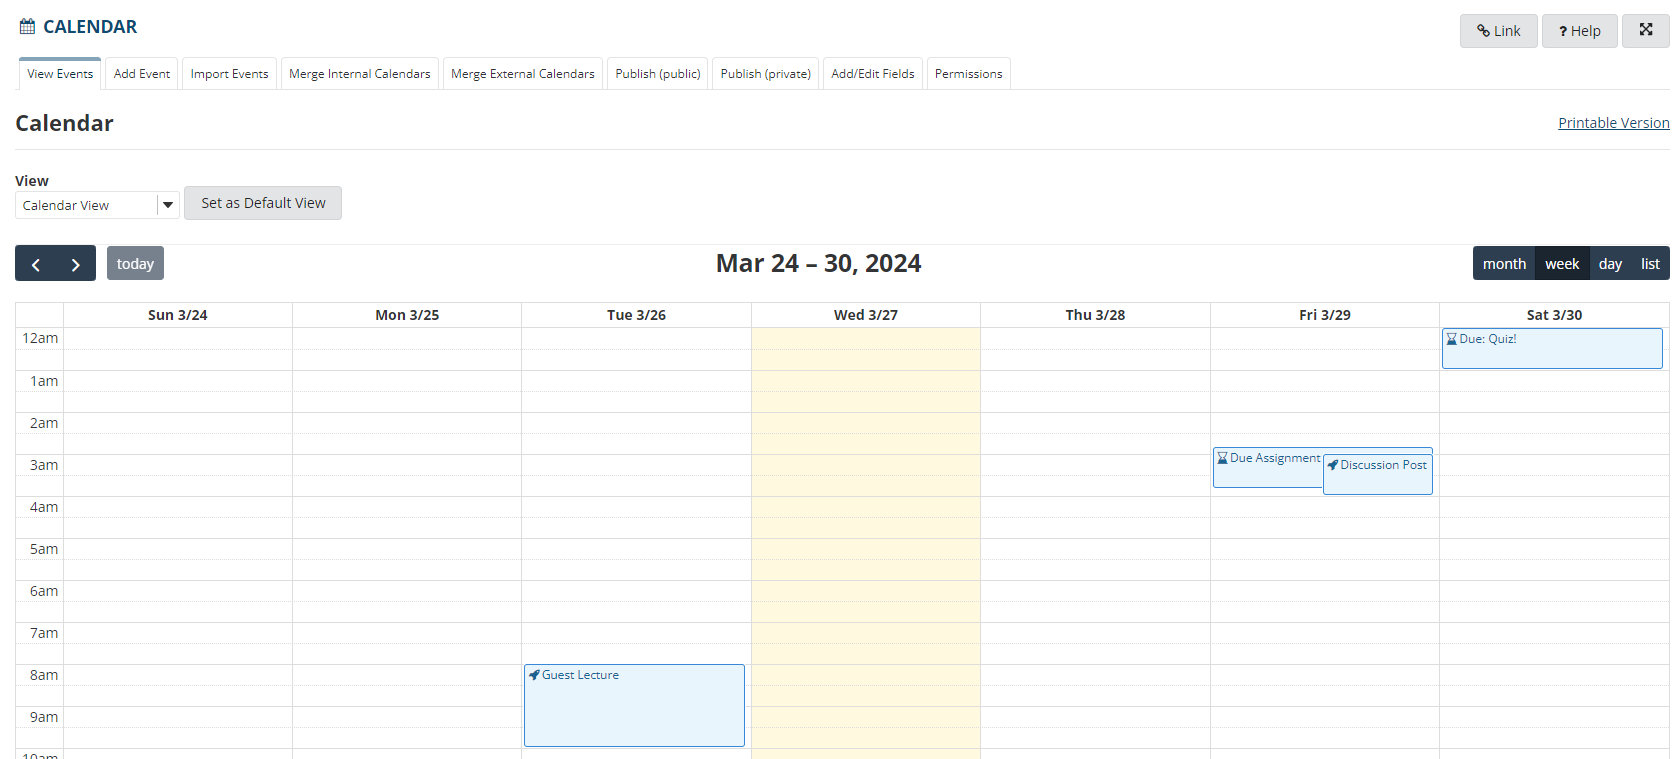
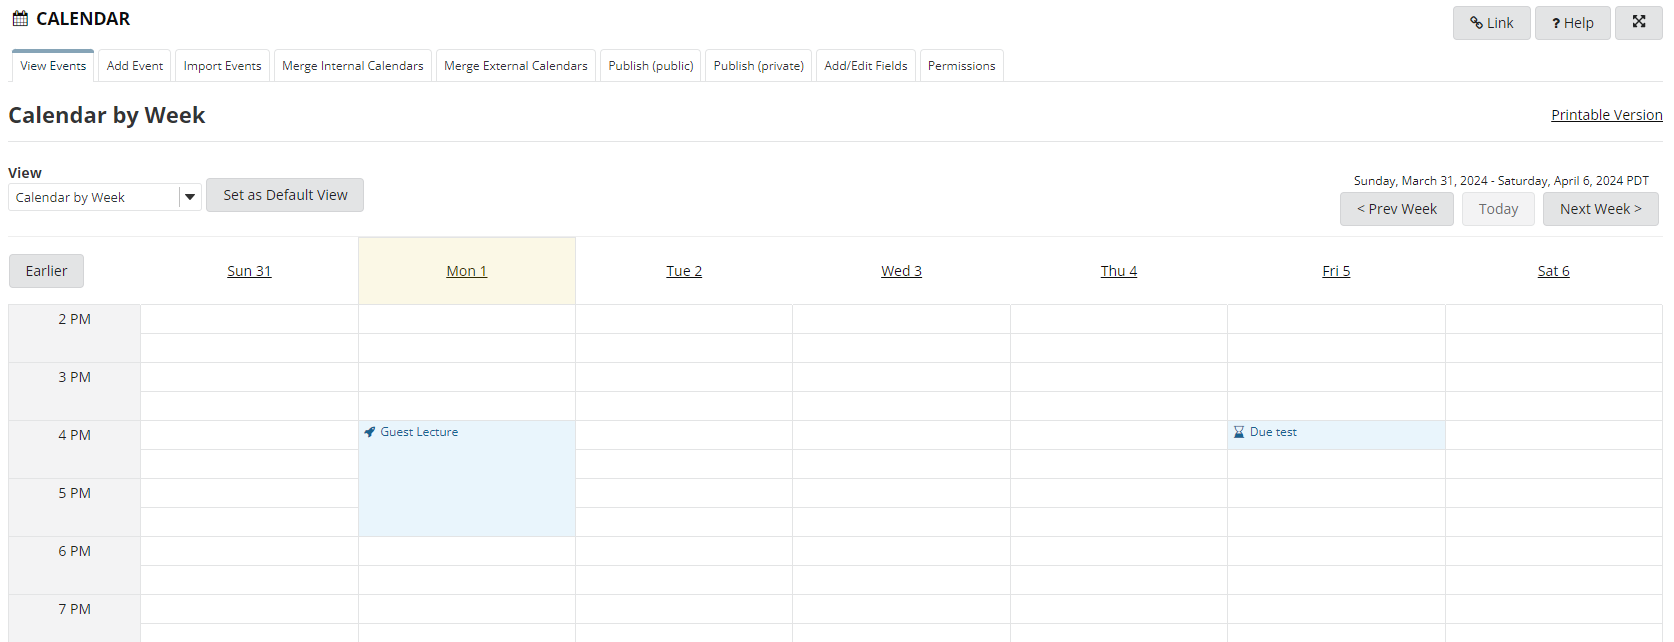
Modernized Calendar Design
The new calendar design provides a cleaner and more modern feel to the Calendar tool, while retaining all of the same functions. Now, the Calendar has smoother lines, an easier to read interface, and more!.
New Calendar:
Old Calendar:
Back to table of contents
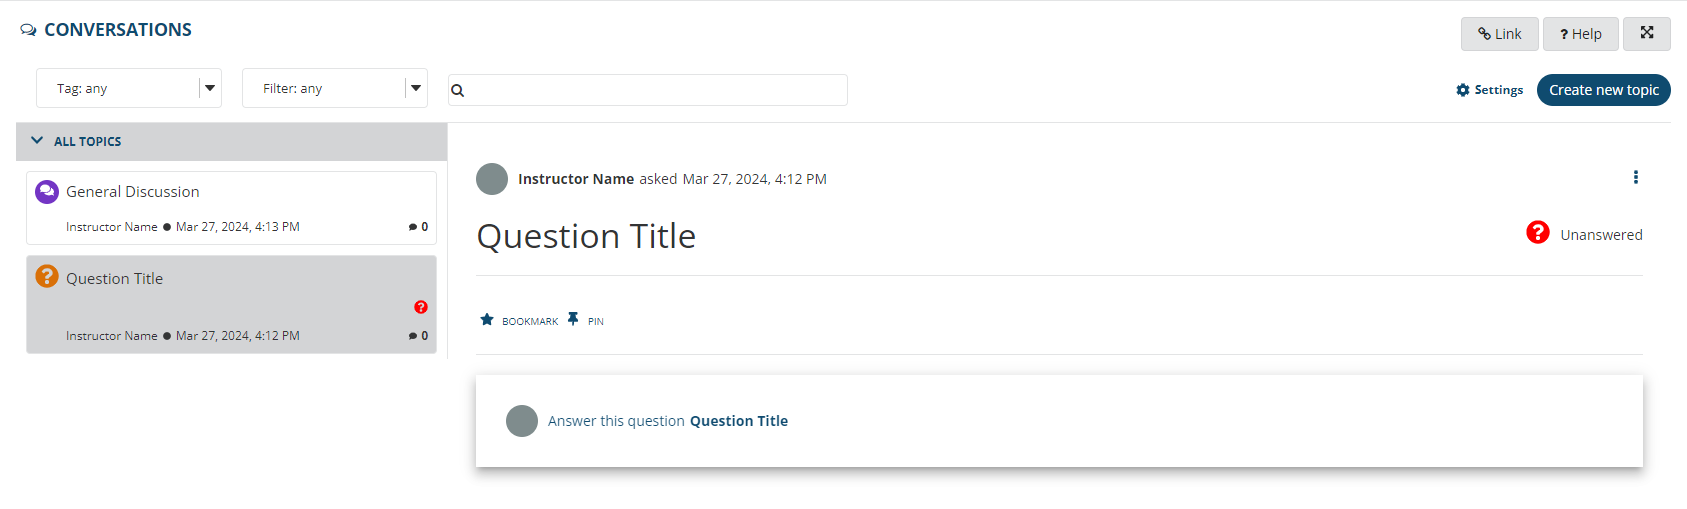
New Tool!
Conversations allows for instructors and/or students to create threaded discussion boards and Q&A. They can respond to questions or discussions posted by student or instructor using both text and emojis. It also allows instructors to group and organize conversation posts by applying custom tags, pinning important topics, searching, and sorting. If you would like a more comprehensive description and tutorial of how to use Conversations, navigate here.
Similar to Discussions, Conversations allows for communication to responses beteen instructors and student, but now Conversations opens a new way to communicate with one another. Conversations mimics other online threaded discussion boards or comment sections to allow for a more direct, personal dialogue between course participants.
Back to table of contents
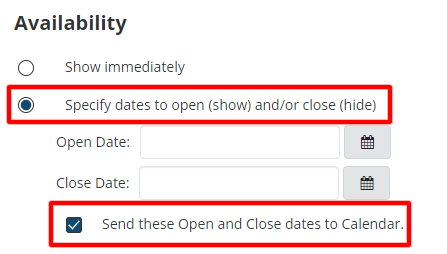
Now allows instructors to show open/close date of Discussion in Calendar
To show a Discussion forum/topic in Calendar:
- Create/Edit a Discussion forum/topic in Calendar
- Under Availability, select Specify dates to open (show) and/or close (hide)
- Fill in the open and close date fields, and ensure that Send these Open and Close dates to Calendar is selected.
- Navigate to your Calendar tool to see your new events.

Back to table of contents
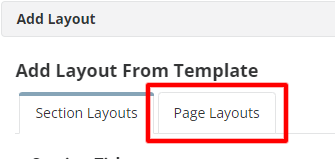
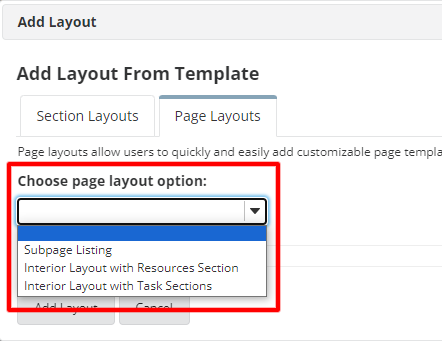
Page Layouts
Added Page Layouts that provided instructors with templates to form their Lessons page off of. This feature will add the new content to the bottom of the page without deleting anything that already exists. Page Layouts offers new templates to change the entirety of your Lessons page with Section Layouts can be used to edit or add sections to your Lessons page.
To add a Page Layout:
- Navigate to your Lessons page.
- Click Add Layout on the top of your page.
- Click Page Layouts
- Choose a page layout option listed under the dropdown menu
- Subpage Listing - This page layout will bulk-add the number of subpages that a user chooses. It's a great option to quickly create a subpage for each week of the term on one page. The options below allow a user to determine the prefix they want to use for each subpage (ex: Week, Module, Topic, etc), how many subpages they want, and some basic styling considerations.
- Interior Layout with Resources Sections - This page layout will bulk add the standard components of an interior lessons template that includes an overview text section where you can list out tasks, a checklist, an important date box, and a section to add resources (files, assignment/quiz links, etc.) Use this as a starting point for a simple way to provide students with what they need to complete a week/section of a course.
- Interior Layout with Tasks Section - This page layout will bulk add the standard components of an interior lessons template that includes an overview text section with some example text where a user can list out their learning outcomes, a checklist, and a definable number of sections to lists out tasks (and files/links) that students need to work through. Use this as a more complex way to provide students with what they need to complete week/section of a course by breaking tasks into their own sections.
- Click Add Layout

Back to table of contents
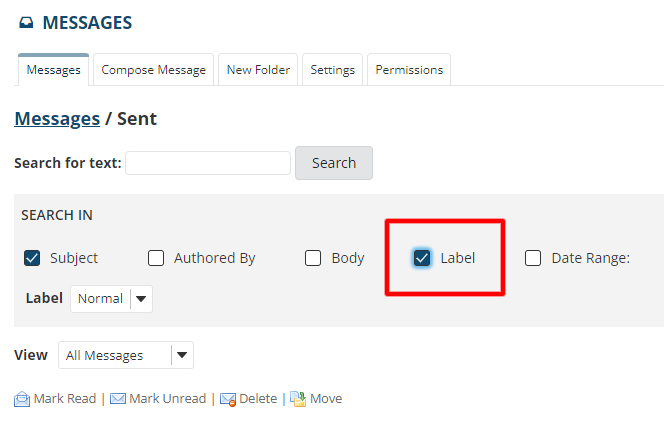
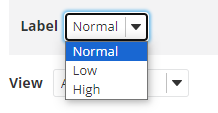
Improved Advanced Search Functionality
When using the Advanced Search feature in Messages you can now filter by Label using a dropdown menu, instead of searching through the searchbar like before.
- In Messages click on any folder you would like to search within.
- Click on Advanced Search.
- Check Label.
- Use the dropdown to select what label you would like to search by.

Back to table of contents
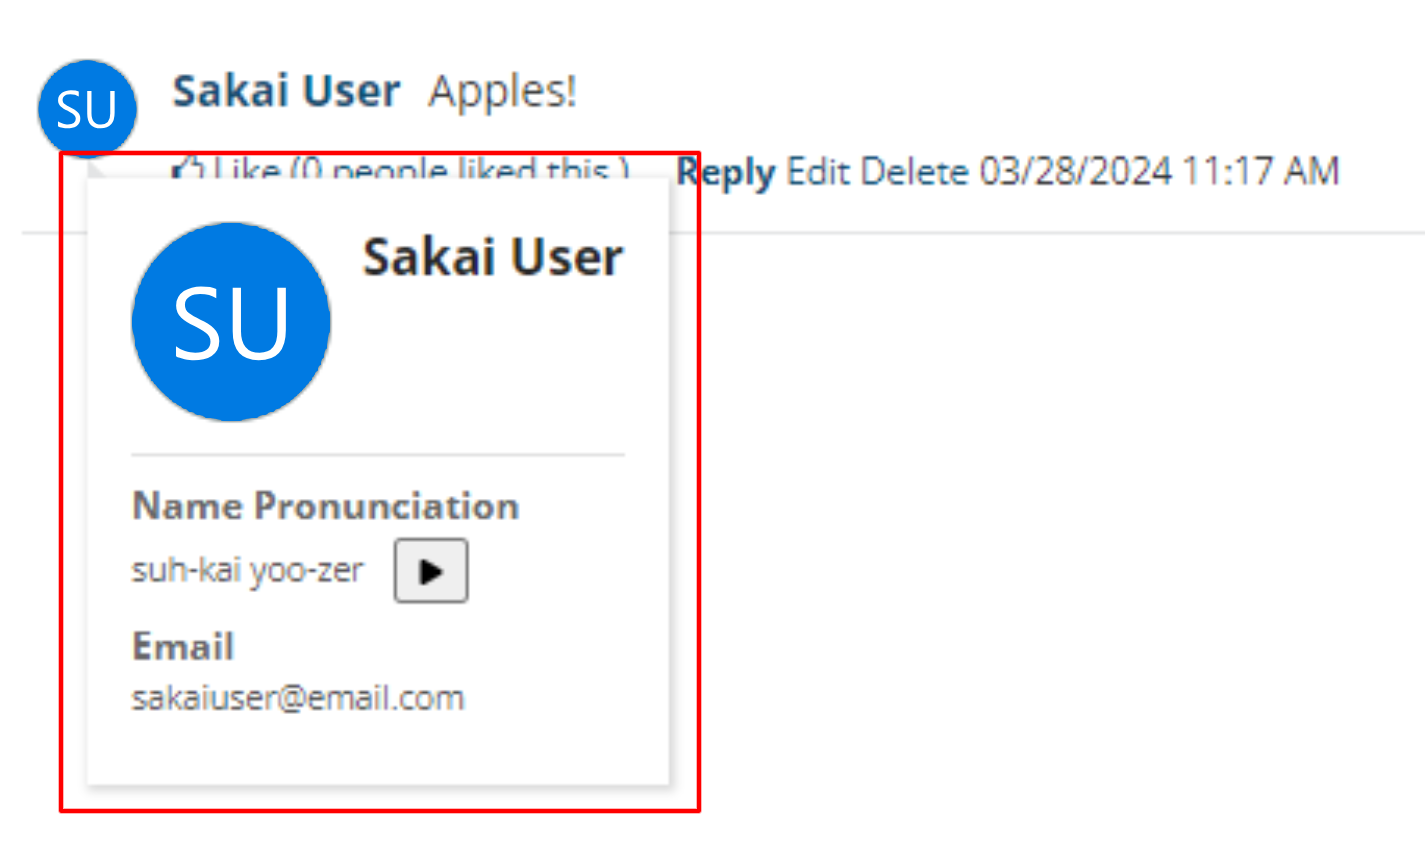
New Profile Popup
When clicking on a profile in tools like Discussions, Commons, Messages and more, now it displays a more modern, cleaner popup that includes one's name pronunciation (if provided) and email.
Back to table of contents
Export to PDF
Now gives you the option to export a rubric as a PDF.
- Navigate to your Rubrics tool in your tool menu.
- Click on the PDF icon under Actions of the rubric you would like to export

Back to table of contents
Criterion Groups
Gives instructors the option to use Criterion groups when creating a rubric. Criterion groups allow for instructors to organize their rubric beyond changing a criterion name. For example, you can create criterion groups for multiple parts of an assignment all of which has their own criterion.
To create criterion group(s):
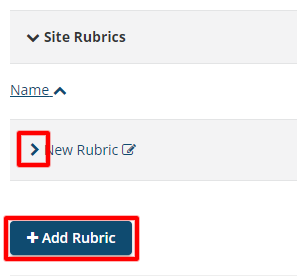
- Navigate to your Rubrics tool in your tool menu.
- Create a new rubric by clicking Add Rubric or edit an existing one by expanding the rubric you would like to edit.
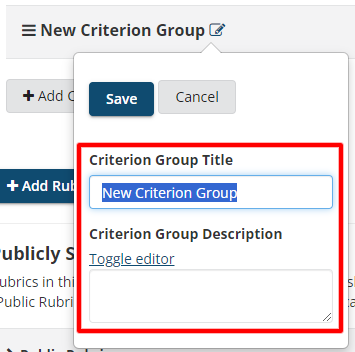
- Click Add Criterion Group.
- (Optional) Change the Criterion Group Title and Description.
- Click and drag the three lines to move the criterion group. Move it directly above the collections of criterions you would like to group together.


Back to table of contents
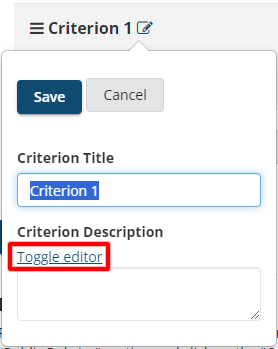
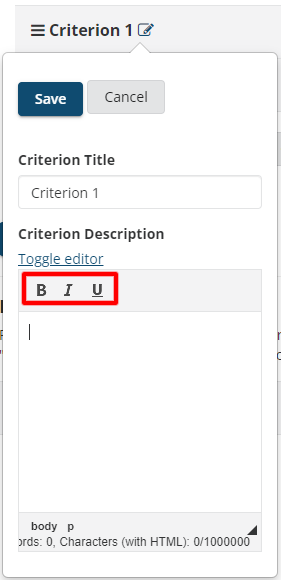
New Text Editor for Criterion Description
Now allows instructors to toggle a new text editor where you can bold, italicize, and/or underline words in their Criterion/Criterion Group descriptions.
To add formatting to your description:
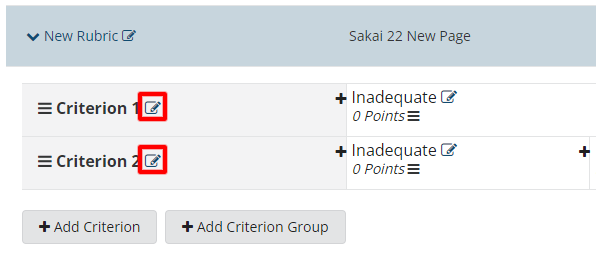
- Create or edit a rubric in the Rubrics tool.
- Click the Edit button next to a criterion name.
- Click Toggle editor.
- Use the bold, italic, and/or underline icons to format your description.
Back to table of contents
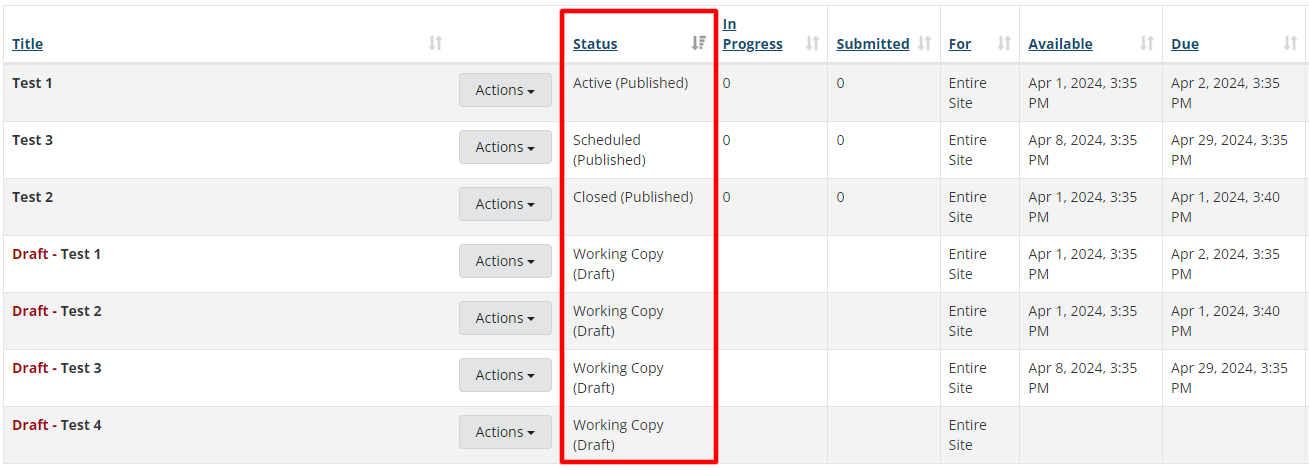
Improve Status Labels
Now presents more accurate status labels for your assessment.
New Labels:
- Active (Published) - Replaces Published - Active, to show when an assessment is open to students and published. Also, allows sorting in ascending order (A to Z) with “Active” or live/open assessments listed at the top.
- Closed (Published) - Replaces Published - Inactive, to show when an assessment was published, but the deadline as passed.
- Schedule (Published) - Replaces Published - Inactive, to show when you published an assessment but is set to open at a future date.
- Working Copy (Draft) - Replaces Draft, to show a draft assessment. Also, allows better sorting with a label that will appear at the end of the alphabet.
Back to table of contents
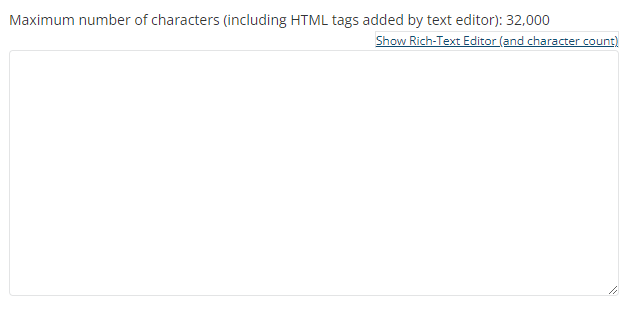
Paste Images Directly into the Text Editor
Now allows you to paste images in the short answer response.
To do paste images:
- Take an assessment with a short answer question.
- Click Show Rich-Text Editor (and character count) above the text box for the short answer.
- Copy an image and Ctrl+V (Windows) or Cmd+V (Mac) to paste the image in the box.

Back to table of contents